
Gmail Filters
Simple Guide On How To Remove Filter In Gmail
February 1st, 2024
Are you tired of sifting through your cluttered Gmail inbox, desperately searching for that important email? It's time to take control and remove the filters that are hindering your productivity. In this blog, we will show you how to remove filters in Gmail, allowing you to regain access to every single email and streamline your digital life.
Imagine the freedom of having a clean and organized Gmail inbox, where every email is at your fingertips. No longer will you have to worry about missing important messages or wasting valuable time searching for that one elusive email. By learning how to remove filters in Gmail, you will unlock the potential of your inbox and free yourself from the chains of clutter.
We will guide you step-by-step through the process of removing filters in Gmail. We will explore various techniques and strategies to ensure that no email goes unnoticed. Say goodbye to the frustration of a cluttered inbox and hello to a streamlined and efficient Gmail experience. So, let's dive in and discover how to remove filters in Gmail and regain control of your digital life. But first, let's address a common concern: how do I empty my mailbox? Stay tuned, and we'll address that question as well!
Table of Contents
Complete Step-by-Step Guide On How To Use Ultra's AI Email Filtering Feature
Take Control of Your Email Inbox With Ultra — Get To Inbox Zero Daily
What Is A Gmail Filter & 5 Filter Ideas

Gmail filters are powerful tools that allow users to automatically organize and manage incoming emails based on pre-defined criteria. Filters act as virtual assistants, helping users stay organized and focused by automatically categorizing and applying actions to specific emails. By creating filters, you can streamline your inbox and have important emails automatically sorted into specific folders or labels, allowing you to prioritize and address them more efficiently.
Now, let's explore five filter ideas for different roles:
1. Founder Filter: Prioritize Important Communications
As a founder, your inbox can easily become overwhelmed with emails from various stakeholders. To ensure you don't miss critical messages, create a filter that automatically marks emails from key partners, investors, or the executive team with a high priority label. This way, you'll be alerted to their importance and can respond promptly.
2. Sales Person Filter: Categorize Leads
For salespeople, managing and organizing leads is crucial. Create a filter that automatically applies a "Leads" label to emails that contain certain keywords or are sent from specific domains associated with potential customers. With this filter in place, you can easily access all relevant leads in one place, making it easier to follow up and nurture relationships.
3. Inbound Email Filter: Sort by Level of Urgency
If you receive a high volume of inbound emails, it can be challenging to prioritize and respond to them effectively. Create a filter that categorizes emails based on their level of urgency. For example, you can create filters that automatically add labels such as "Urgent," "Important," or "Low Priority" to emails containing specific keywords or from specific senders. This way, you can quickly identify and address time-sensitive matters.
4. Personal Assistant Filter: Separate Personal and Work Emails
When juggling personal and work-related emails, it's helpful to keep them separate for better organization. Create a filter that automatically applies a "Personal" or "Work" label to emails based on specific criteria such as sender, subject, or keywords. This filter will help you maintain a clear distinction between personal and professional communications.
5. Social Media Filter: Streamline Notifications
Social media notifications can clutter your inbox and distract you from important emails. Create a filter that automatically archives or labels emails related to social media notifications, such as likes, comments, or followers. By doing so, you can keep your inbox focused on relevant conversations and minimize distractions.
By implementing these filters, you can unleash the full potential of Gmail's organizational capabilities and regain control over your inbox. Experiment with different criteria and combinations until you find the right filters that align with your priorities and workflow.
Related Reading
• Email Filters Gmail
• Spam Filter Iphone Email
• Gmail Date Filter
• Gmail Filter Syntax
• Gmail Apply Filter Retroactively
Simple Guide On How To Remove Filter In Gmail

Creating filters in Gmail can be a useful way to organize and manage your incoming emails. There may come a time when you no longer need a particular filter and want to remove it. I will walk you through the step-by-step process of removing a filter in Gmail.
1. Accessing Gmail Settings
To begin, you'll need to access the Gmail settings. You can do this by clicking on the gear icon located in the top right corner of your Gmail inbox. From the dropdown menu, select "See all settings."
2. Navigating to Filter and Blocked Addresses
In the Gmail settings, you'll see various tabs at the top. Click on the tab labeled "Filters and Blocked Addresses." This tab is where you can manage all your filters.
3. Locating the Filter to Remove
Once you're in the "Filters and Blocked Addresses" tab, scroll down to find the filter you want to remove. Gmail lists all your filters in this section, making it easy to locate the one you need.
4. Editing the Filter
To remove the filter, click on the "Edit" link next to the filter you want to delete. This will open a window where you can modify the filter settings.
5. Removing the Filter
In the filter settings window, scroll down to the bottom and click on the "Delete" button. Gmail will prompt you to confirm the deletion. Select "OK" to confirm and remove the filter.
6. Saving Changes
After deleting the filter, make sure to save your changes by clicking on the "Save Changes" button. This ensures that the filter is permanently removed from your Gmail account.
7. Verifying the Removal
To verify the successful removal of the filter, go back to your Gmail inbox and check if the filter no longer affects incoming emails. If the filter has been properly removed, you should no longer see any changes or redirections based on its settings.
Removing a filter in Gmail is a simple process that can help you streamline your email management. By following the steps outlined in this section, you can easily remove any unnecessary filters and ensure that your Gmail inbox remains organized according to your preferences. Remember to review your filters periodically to ensure they still serve a purpose and remove any that are no longer needed.
Related Reading
• Best Email Spam Filter
• How To Filter Unread Emails In Gmail
• Gmail Filter Move To Folder
• Gmail Filter Wildcard
• Gmail Filter Multiple Email Addresses
• Gmail Filter For Multiple Email Addresses
• Gmail Disable Spam Filter
• Gmail Filter Has The Words
• Gmail Filter Email To Folder
• Gmail Filter Subject Contains Words
• Gmail Filter Older Than
• Gmail Filter Regex
• Gmail Filter Delete After X Days
• Gmail Filter Multiple Senders
• Gmail Filter Calendar Invites
• Reset Gmail Spam Filter
• Gmail Create Filter To Forward Email
• Gmail Filter Apply Multiple Labels
• How To Filter Large Emails In Gmail
• Gmail Filter Not From Domain
Complete Step-by-Step Guide On How To Use Ultra's AI Email Filtering Feature
Watch this guide to learn how to use Ultra to empty your mailbox in minutes, today!
Chat with your email inbox like ChatGPT, get a daily to-do list based on your inbox, and much more.
Try Ultra for free today and discover a whole new way to manage your emails with AI. Save time, never miss important emails again, and unleash the full potential of your inbox with Ultra.
Take Control of Your Email Inbox With Ultra — Get To Inbox Zero Daily
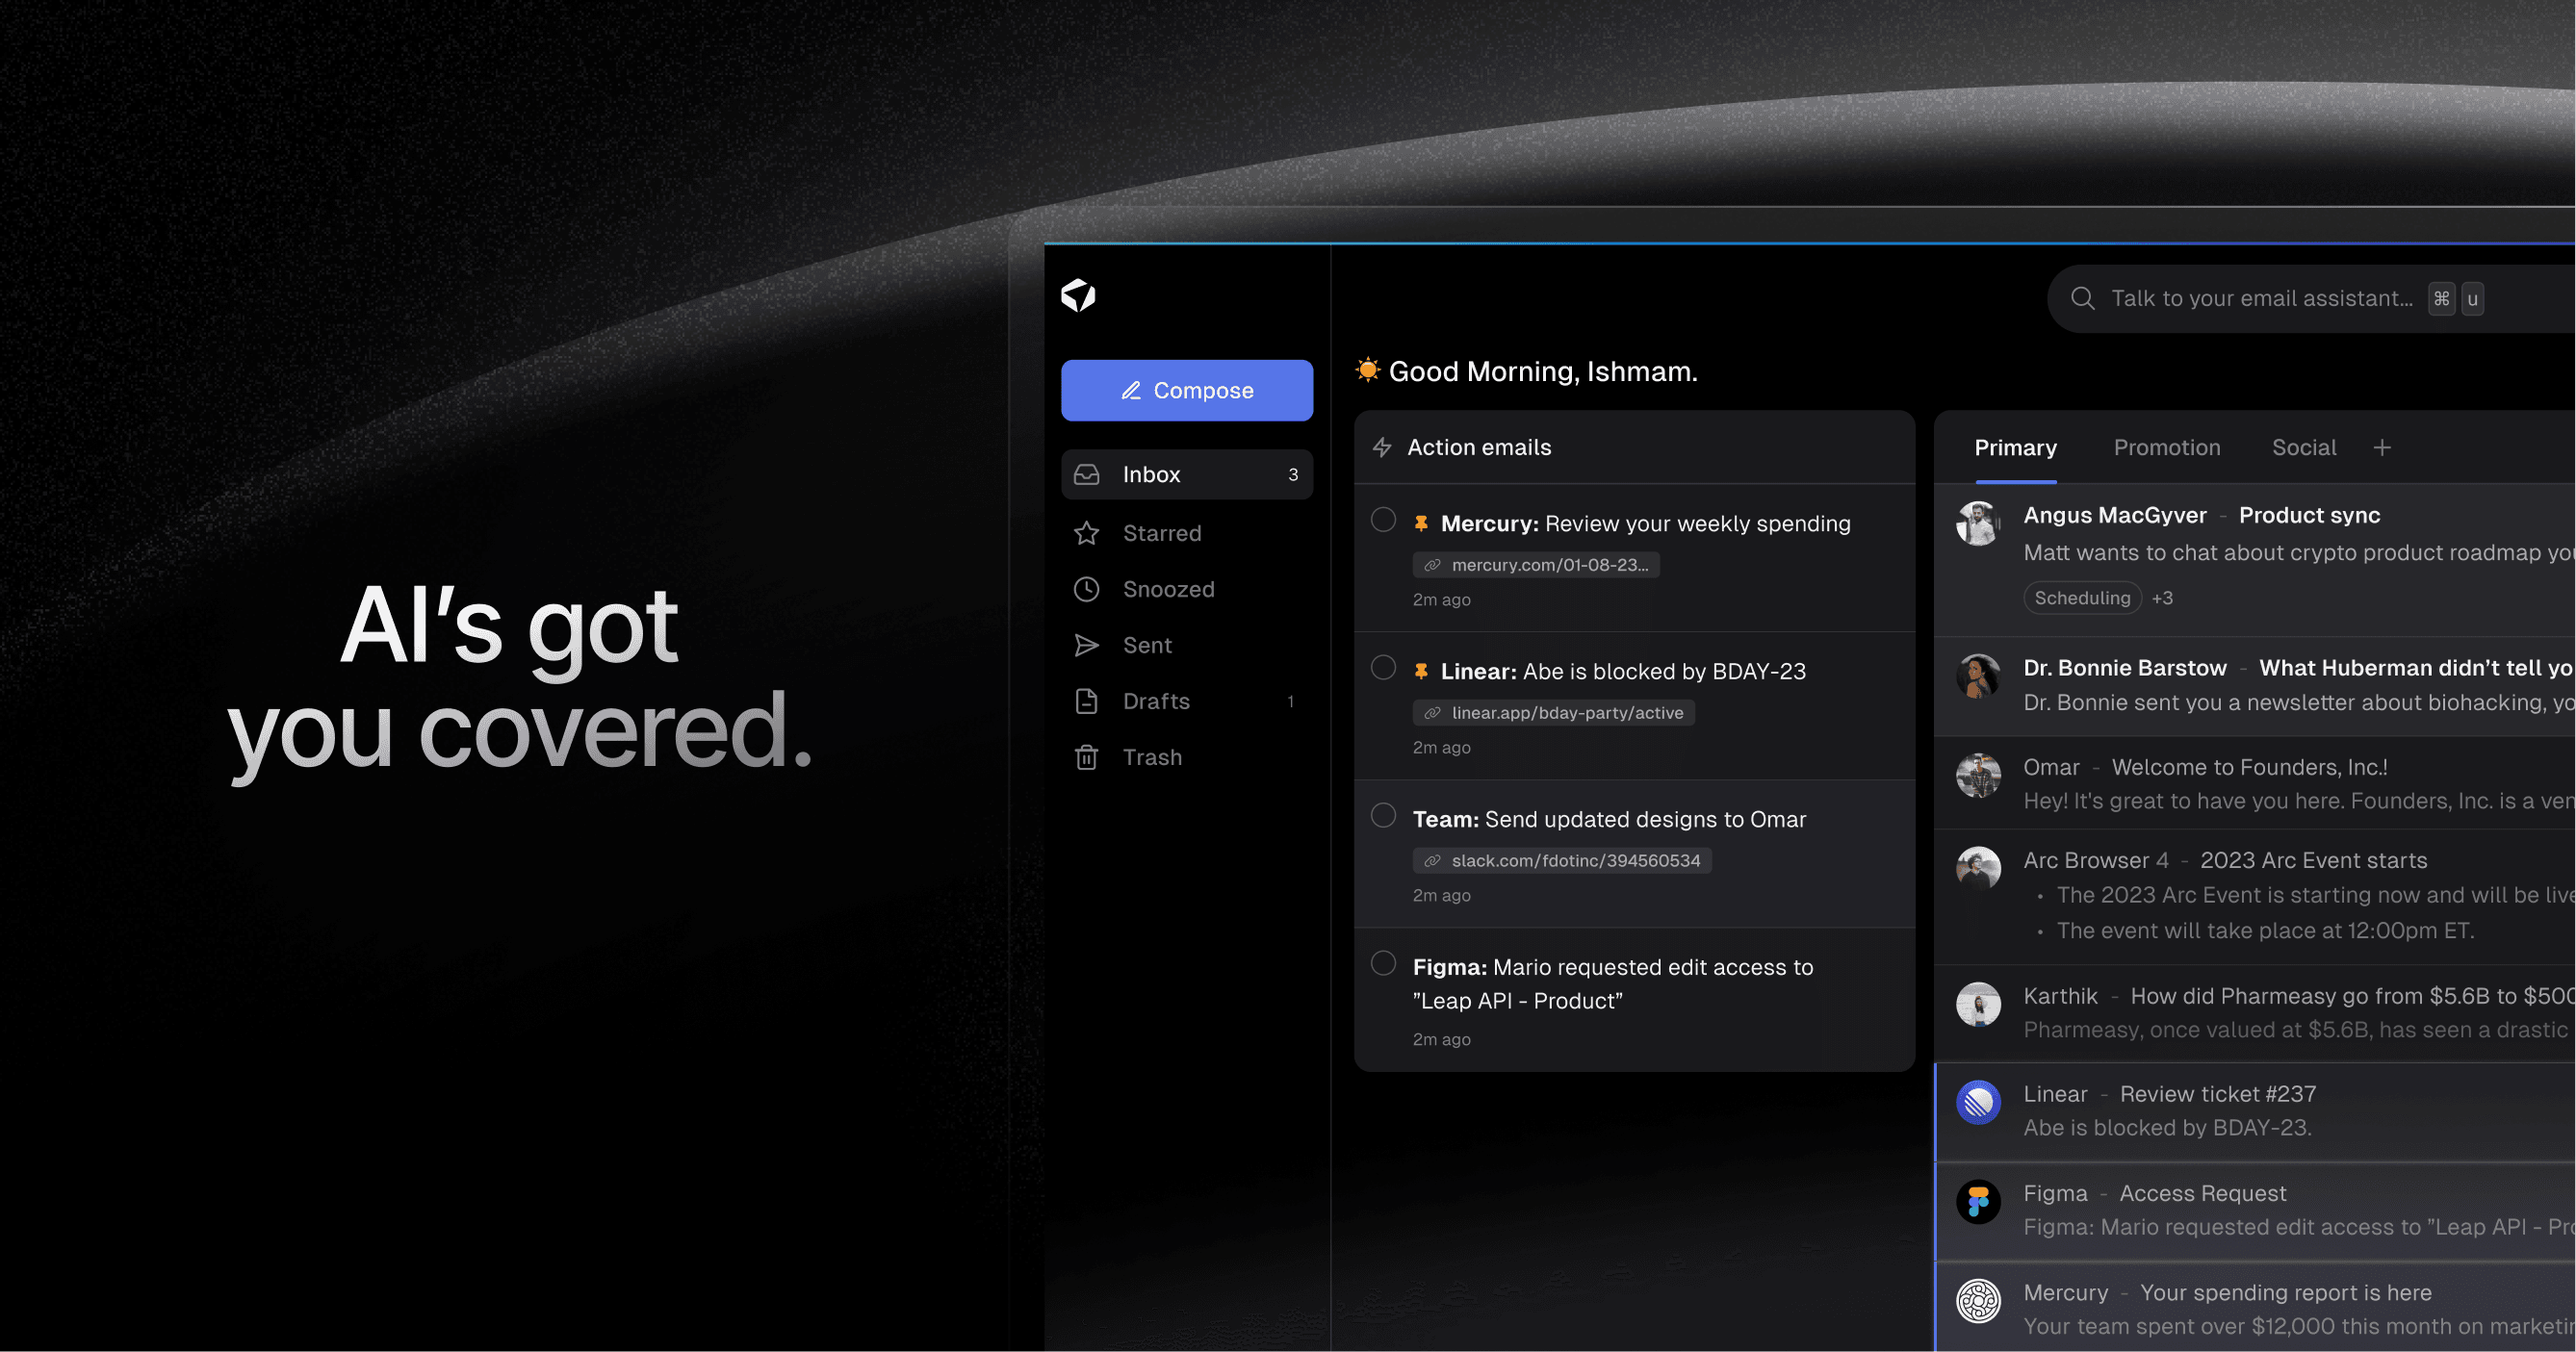
Sick of sifting through endless email threads, missing important action items, and drowning in spam outreach emails? Imagine a world without the headache of overloaded inboxes. Well, now you can have just that! Introducing Ultra, the revolutionary AI-powered email assistant that will change the way you manage your emails forever.
Crush Your Inbox with AI-Powered Efficiency
With Ultra, you can say goodbye to wasting precious hours sorting through emails. Our advanced AI algorithms analyze your inbox and identify key action items based on the content of your emails and calendar. By auto-generating AI todos, Ultra helps you prioritize and stay on top of your tasks effortlessly. Now you can tackle your inbox in minutes and spend more time on what truly matters.
Chat with Your Inbox, Just Like ChatGPT
Imagine having a conversation with your inbox as if you were chatting with a real person. Ultra brings the power of ChatGPT to your email experience, allowing you to communicate naturally and efficiently. Simply ask Ultra to find specific emails, schedule meetings, or even draft responses for you. This seamless integration of AI technology makes managing your inbox a breeze.
AI-Shortened Summaries for Effortless Skimming
We understand that you don't always have time to read through lengthy emails. That's why Ultra provides AI-shortened summaries that allow you to skim through the key points at a glance. No more wasting time scrolling through endless paragraphs. Ultra's summaries ensure that you never miss out on important information and can quickly make decisions on how to prioritize your emails.
Try Ultra's Free AI Email Assistant Today!
Ready to reclaim your time and never miss another email again? Trying out Ultra's AI email assistant is as easy as logging in with your Google account. In just a few minutes, you'll be set up and ready to experience the power of Ultra. Say goodbye to inbox overwhelm and hello to maximum efficiency.
Save time, boost productivity, and stay on top of your inbox like never before. Try Ultra's free AI email assistant today and see the difference it can make in your email management. Take control of your inbox and unlock a world of possibilities with Ultra!
Related Reading
• Gmail Spam Filter Not Working
• Free Email Spam Filter For Android
• Email Spam Filter Service
Are you tired of sifting through your cluttered Gmail inbox, desperately searching for that important email? It's time to take control and remove the filters that are hindering your productivity. In this blog, we will show you how to remove filters in Gmail, allowing you to regain access to every single email and streamline your digital life.
Imagine the freedom of having a clean and organized Gmail inbox, where every email is at your fingertips. No longer will you have to worry about missing important messages or wasting valuable time searching for that one elusive email. By learning how to remove filters in Gmail, you will unlock the potential of your inbox and free yourself from the chains of clutter.
We will guide you step-by-step through the process of removing filters in Gmail. We will explore various techniques and strategies to ensure that no email goes unnoticed. Say goodbye to the frustration of a cluttered inbox and hello to a streamlined and efficient Gmail experience. So, let's dive in and discover how to remove filters in Gmail and regain control of your digital life. But first, let's address a common concern: how do I empty my mailbox? Stay tuned, and we'll address that question as well!
Table of Contents
Complete Step-by-Step Guide On How To Use Ultra's AI Email Filtering Feature
Take Control of Your Email Inbox With Ultra — Get To Inbox Zero Daily
What Is A Gmail Filter & 5 Filter Ideas
Gmail filters are powerful tools that allow users to automatically organize and manage incoming emails based on pre-defined criteria. Filters act as virtual assistants, helping users stay organized and focused by automatically categorizing and applying actions to specific emails. By creating filters, you can streamline your inbox and have important emails automatically sorted into specific folders or labels, allowing you to prioritize and address them more efficiently.
Now, let's explore five filter ideas for different roles:
1. Founder Filter: Prioritize Important Communications
As a founder, your inbox can easily become overwhelmed with emails from various stakeholders. To ensure you don't miss critical messages, create a filter that automatically marks emails from key partners, investors, or the executive team with a high priority label. This way, you'll be alerted to their importance and can respond promptly.
2. Sales Person Filter: Categorize Leads
For salespeople, managing and organizing leads is crucial. Create a filter that automatically applies a "Leads" label to emails that contain certain keywords or are sent from specific domains associated with potential customers. With this filter in place, you can easily access all relevant leads in one place, making it easier to follow up and nurture relationships.
3. Inbound Email Filter: Sort by Level of Urgency
If you receive a high volume of inbound emails, it can be challenging to prioritize and respond to them effectively. Create a filter that categorizes emails based on their level of urgency. For example, you can create filters that automatically add labels such as "Urgent," "Important," or "Low Priority" to emails containing specific keywords or from specific senders. This way, you can quickly identify and address time-sensitive matters.
4. Personal Assistant Filter: Separate Personal and Work Emails
When juggling personal and work-related emails, it's helpful to keep them separate for better organization. Create a filter that automatically applies a "Personal" or "Work" label to emails based on specific criteria such as sender, subject, or keywords. This filter will help you maintain a clear distinction between personal and professional communications.
5. Social Media Filter: Streamline Notifications
Social media notifications can clutter your inbox and distract you from important emails. Create a filter that automatically archives or labels emails related to social media notifications, such as likes, comments, or followers. By doing so, you can keep your inbox focused on relevant conversations and minimize distractions.
By implementing these filters, you can unleash the full potential of Gmail's organizational capabilities and regain control over your inbox. Experiment with different criteria and combinations until you find the right filters that align with your priorities and workflow.
Related Reading
• Email Filters Gmail
• Spam Filter Iphone Email
• Gmail Date Filter
• Gmail Filter Syntax
• Gmail Apply Filter Retroactively
Simple Guide On How To Remove Filter In Gmail
Creating filters in Gmail can be a useful way to organize and manage your incoming emails. There may come a time when you no longer need a particular filter and want to remove it. I will walk you through the step-by-step process of removing a filter in Gmail.
1. Accessing Gmail Settings
To begin, you'll need to access the Gmail settings. You can do this by clicking on the gear icon located in the top right corner of your Gmail inbox. From the dropdown menu, select "See all settings."
2. Navigating to Filter and Blocked Addresses
In the Gmail settings, you'll see various tabs at the top. Click on the tab labeled "Filters and Blocked Addresses." This tab is where you can manage all your filters.
3. Locating the Filter to Remove
Once you're in the "Filters and Blocked Addresses" tab, scroll down to find the filter you want to remove. Gmail lists all your filters in this section, making it easy to locate the one you need.
4. Editing the Filter
To remove the filter, click on the "Edit" link next to the filter you want to delete. This will open a window where you can modify the filter settings.
5. Removing the Filter
In the filter settings window, scroll down to the bottom and click on the "Delete" button. Gmail will prompt you to confirm the deletion. Select "OK" to confirm and remove the filter.
6. Saving Changes
After deleting the filter, make sure to save your changes by clicking on the "Save Changes" button. This ensures that the filter is permanently removed from your Gmail account.
7. Verifying the Removal
To verify the successful removal of the filter, go back to your Gmail inbox and check if the filter no longer affects incoming emails. If the filter has been properly removed, you should no longer see any changes or redirections based on its settings.
Removing a filter in Gmail is a simple process that can help you streamline your email management. By following the steps outlined in this section, you can easily remove any unnecessary filters and ensure that your Gmail inbox remains organized according to your preferences. Remember to review your filters periodically to ensure they still serve a purpose and remove any that are no longer needed.
Related Reading
• Best Email Spam Filter
• How To Filter Unread Emails In Gmail
• Gmail Filter Move To Folder
• Gmail Filter Wildcard
• Gmail Filter Multiple Email Addresses
• Gmail Filter For Multiple Email Addresses
• Gmail Disable Spam Filter
• Gmail Filter Has The Words
• Gmail Filter Email To Folder
• Gmail Filter Subject Contains Words
• Gmail Filter Older Than
• Gmail Filter Regex
• Gmail Filter Delete After X Days
• Gmail Filter Multiple Senders
• Gmail Filter Calendar Invites
• Reset Gmail Spam Filter
• Gmail Create Filter To Forward Email
• Gmail Filter Apply Multiple Labels
• How To Filter Large Emails In Gmail
• Gmail Filter Not From Domain
Complete Step-by-Step Guide On How To Use Ultra's AI Email Filtering Feature
Watch this guide to learn how to use Ultra to empty your mailbox in minutes, today!
Chat with your email inbox like ChatGPT, get a daily to-do list based on your inbox, and much more.
Try Ultra for free today and discover a whole new way to manage your emails with AI. Save time, never miss important emails again, and unleash the full potential of your inbox with Ultra.
Take Control of Your Email Inbox With Ultra — Get To Inbox Zero Daily
Sick of sifting through endless email threads, missing important action items, and drowning in spam outreach emails? Imagine a world without the headache of overloaded inboxes. Well, now you can have just that! Introducing Ultra, the revolutionary AI-powered email assistant that will change the way you manage your emails forever.
Crush Your Inbox with AI-Powered Efficiency
With Ultra, you can say goodbye to wasting precious hours sorting through emails. Our advanced AI algorithms analyze your inbox and identify key action items based on the content of your emails and calendar. By auto-generating AI todos, Ultra helps you prioritize and stay on top of your tasks effortlessly. Now you can tackle your inbox in minutes and spend more time on what truly matters.
Chat with Your Inbox, Just Like ChatGPT
Imagine having a conversation with your inbox as if you were chatting with a real person. Ultra brings the power of ChatGPT to your email experience, allowing you to communicate naturally and efficiently. Simply ask Ultra to find specific emails, schedule meetings, or even draft responses for you. This seamless integration of AI technology makes managing your inbox a breeze.
AI-Shortened Summaries for Effortless Skimming
We understand that you don't always have time to read through lengthy emails. That's why Ultra provides AI-shortened summaries that allow you to skim through the key points at a glance. No more wasting time scrolling through endless paragraphs. Ultra's summaries ensure that you never miss out on important information and can quickly make decisions on how to prioritize your emails.
Try Ultra's Free AI Email Assistant Today!
Ready to reclaim your time and never miss another email again? Trying out Ultra's AI email assistant is as easy as logging in with your Google account. In just a few minutes, you'll be set up and ready to experience the power of Ultra. Say goodbye to inbox overwhelm and hello to maximum efficiency.
Save time, boost productivity, and stay on top of your inbox like never before. Try Ultra's free AI email assistant today and see the difference it can make in your email management. Take control of your inbox and unlock a world of possibilities with Ultra!
Related Reading
• Gmail Spam Filter Not Working
• Free Email Spam Filter For Android
• Email Spam Filter Service
Imagine a world without inboxes.