
Gmail Filters
How To Use The Gmail Filter Email to Folder & AI Email Filtering Tool
February 3rd, 2024
In today's digital age, managing our overflowing email inboxes can feel like an uphill battle. The constant influx of messages, notifications, and newsletters can quickly become overwhelming, leaving us buried under a mountain of unread emails. There is a solution that will not only declutter your inbox but also help you regain control over your digital life: Gmail filter email to folder.
Imagine a world where your emails are neatly organized, effortlessly sorted into specific folders, and easily accessible whenever you need them. With Gmail's powerful filtering system, this utopia becomes a reality. By setting up filters based on keywords, senders, or even specific phrases, you can ensure that each email lands in its designated folder, ready for you to peruse at your leisure. Whether you're a busy professional trying to streamline your workflow or a casual email user looking to take back control, Gmail filter email to folder is the answer you've been searching for.
Not only does Gmail's filtering system help you categorize and organize your incoming emails, but it also provides you with the tools to clear out your mailbox quickly and efficiently. Say goodbye to the days of endlessly scrolling through a cluttered inbox, desperately searching for that one important email. With a few simple clicks, you can can learn "how do I empty my mailbox" and free up valuable digital real estate.
Table of Contents
Complete Step-by-Step Guide On How To Use Ultra's AI Email Filtering Feature
Take Control of Your Email Inbox With Ultra — Get To Inbox Zero Daily
What Is A Gmail Filter?

A Gmail filter is a powerful tool that allows users to automate the organization and management of their email inbox. With Gmail filters, users can create rules that automatically perform specific actions on incoming emails based on a set of criteria. These criteria can include sender, recipient, subject line, keywords, attachments, and more.
Efficient Inbox Management
By setting up filters, users can ensure that their emails are sorted and directed to specific folders or labels, making it easier to find and prioritize important messages. For example, users can create filters to automatically label emails from specific senders, move emails with certain keywords to a designated folder, or mark emails as important based on certain criteria.
Reducing Inbox Overwhelm
Gmail filters not only help in organizing the inbox but also in reducing clutter and improving productivity. By automatically filtering and categorizing incoming emails, users can focus on the most relevant messages and avoid being overwhelmed by an overflowing inbox.
Ultra's Free AI Email Assistant
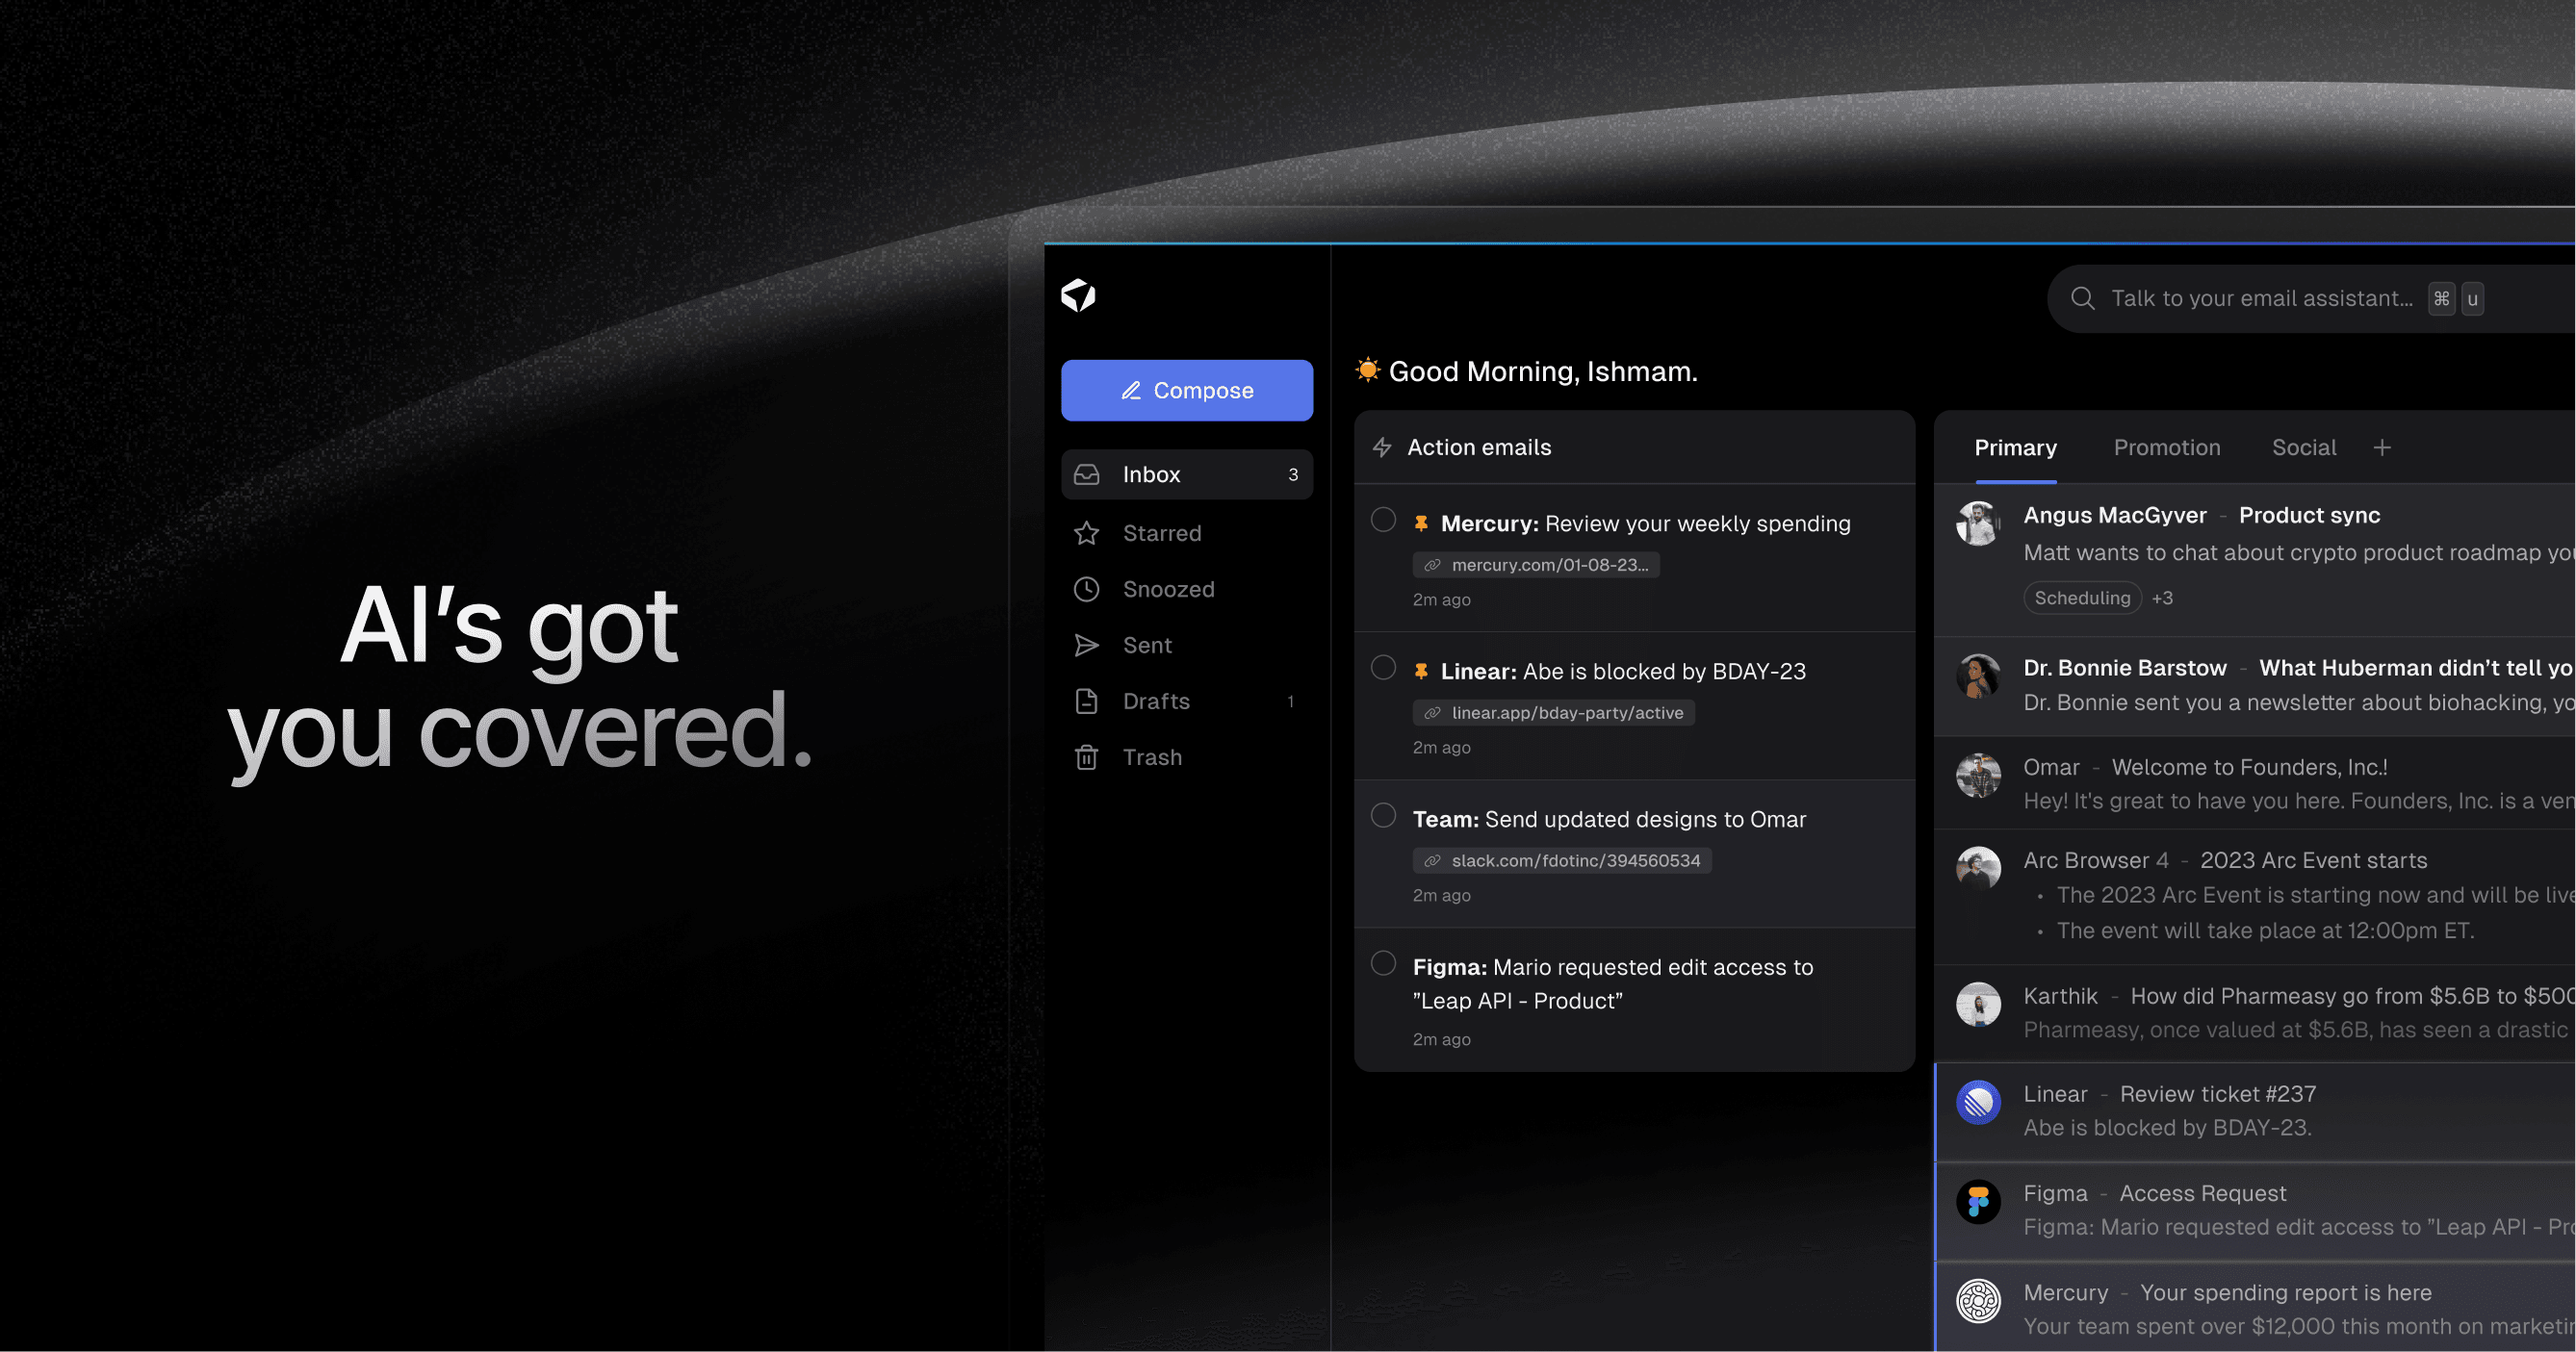
Everyone is tired of missing important action items and info in long email threads, and getting their emails flooded with spam outreach emails. Imagine a world without inboxes. Email has never been better. Leverage AI to crush your inbox, find what you need, and do more faster. What if an AI took care of your inbox? With Ultra you can get through your emails in minutes with AI.
With Ultra, you can Auto generate AI todo's based on your emails and calendar, You can chat with your inbox like it's ChatGPT (email assistant), and you get AI-shortened summaries so you can skim through it at a glance. Try Ultra’s free AI email assistant today — just login with Google and you’ll be set to go within minutes. Save time and never miss emails again with Ultra.
Related Reading
• Email Filters Gmail
• Spam Filter Iphone Email
• Gmail Date Filter
• Gmail Filter Syntax
• How To Remove Filter In Gmail
• Gmail Apply Filter Retroactively
How To Use The Gmail Filter Email to Folder

Gmail offers a powerful feature called filters that allows you to automatically organize your incoming emails into specific folders. This feature can save you time and help you keep your inbox well-organized. We will walk you through the process of using Gmail's filter email to folder feature.
1. Accessing Gmail Settings
To get started, open your Gmail account and click on the gear icon located at the top right corner of the screen. From the dropdown menu, select "Settings."
2. Creating a New Filter
In the Settings menu, click on the "Filters and Blocked Addresses" tab. Scroll down to find the "Create a new filter" link and click on it.
3. Setting the Filter Criteria
In the "Create filter" dialog box, you can specify the criteria that Gmail will use to filter your emails. There are several options available:
From: Enter the email address or name of the sender you want to filter.
To: Enter your email address to filter emails that were sent specifically to you.
Subject: Filter emails based on the subject line.
Has the words: Filter emails that contain specific keywords.
Doesn't have: Exclude emails that contain certain keywords.
Size: Filter emails based on their size (in kilobytes).
Has attachment: Filter emails that have attachments.
Choose the criteria that best suits your needs and fill in the appropriate fields.
4. Applying the Filter
After specifying the filter criteria, click on the "Create filter" button located at the bottom right corner of the dialog box.
5. Selecting the Action
In the next dialog box, you can choose what action Gmail should take when it detects an email that matches the filter criteria. One of the options available is "Skip the Inbox (Archive it)." Selecting this option will send filtered emails directly to the designated folder, bypassing the inbox.
6. Creating a New Folder
If you haven't created a folder to store your filtered emails yet, you can do so by clicking on the "Choose label" dropdown menu. From there, select "New label" and enter the desired name for your folder.
7. Applying the Filter
To apply the filter, click on the "Create filter" button. Gmail will now filter any incoming emails that match the criteria and send them to the designated folder.
8. Managing Existing Filters
If you want to edit or delete an existing filter, return to the "Filters and Blocked Addresses" tab in the Settings menu. You will see a list of all your filters. To edit a filter, click on the "Edit" link next to the filter you want to modify. To delete a filter, click on the "Delete" link.
Using Gmail's filter email to folder feature can help you stay organized and save time by automatically sorting your incoming emails. By following the step-by-step guide outlined above, you can easily set up filters to direct specific emails to designated folders within your Gmail account.
Complete Step-by-Step Guide On How To Use Ultra's AI Email Filtering Feature
Watch this guide to learn how to use Ultra to empty your mailbox in minutes, today!
Chat with your email inbox like ChatGPT, get a daily to-do list based on your inbox, and much more.
Try Ultra for free today and discover a whole new way to manage your emails with AI. Save time, never miss important emails again, and unleash the full potential of your inbox with Ultra.
Related Reading
• Best Email Spam Filter
• How To Filter Unread Emails In Gmail
• Gmail Filter Move To Folder
• Gmail Filter Wildcard
• Gmail Filter Multiple Email Addresses
• Gmail Filter For Multiple Email Addresses
• Gmail Disable Spam Filter
• Gmail Filter Has The Words
• Gmail Filter Subject Contains Words
• Gmail Filter Older Than
• Gmail Filter Regex
• Gmail Filter Delete After X Days
• Gmail Filter Multiple Senders
• Gmail Filter Calendar Invites
• Reset Gmail Spam Filter
• Gmail Create Filter To Forward Email
• Gmail Filter Apply Multiple Labels
• How To Filter Large Emails In Gmail
• Gmail Filter Not From Domain
Take Control of Your Email Inbox With Ultra — Get To Inbox Zero Daily
Managing our email inboxes can often feel like an overwhelming task. We find ourselves sifting through long email threads, struggling to locate important action items and vital information buried within the clutter. On top of that, our inboxes are flooded with spam outreach emails that distract us from what truly matters. But what if there was a way to revolutionize email management and make our inboxes more efficient than ever before?
Ultra, the AI-powered email assistant that will change the way you interact with your inbox forever. With Ultra, you can say goodbye to endless scrolling and hello to a streamlined email experience. Utilizing the power of AI, Ultra helps you prioritize and organize your emails, allowing you to find what you need and take action faster.
Auto-Generated AI To-dos for Enhanced Productivity
One of the standout features of Ultra is its ability to automatically generate AI todo's based on your emails and calendar. By analyzing the content of your emails and understanding your scheduling preferences, Ultra can identify important tasks and deadlines, and create todos for you. With this feature, you can easily stay on top of your commitments and never miss a deadline again.
Chat with Your Inbox Like It's ChatGPT
Imagine being able to communicate with your inbox as effortlessly as chatting with a virtual assistant. Ultra brings this vision to life by allowing you to chat with your inbox using natural language. Just like ChatGPT, Ultra understands your commands and responds accordingly. Whether you want to search for specific emails, archive messages, or schedule meetings, you can simply chat with Ultra and let it handle the rest.
AI-Shortened Summaries for Efficient Email Skimming
In a world where time is of the essence, skimming through lengthy emails can be a daunting task. Ultra solves this problem by providing AI-shortened summaries for each email. These summaries give you a quick overview of the email content, allowing you to grasp the key points at a glance. With this feature, you can save time by prioritizing the emails that require immediate attention and swiftly moving through the rest.
Try Ultra's Free AI Email Assistant Today!
Are you ready to take control of your inbox and experience the benefits of AI-powered email management? Try Ultra's free AI email assistant today. All you need to do is log in with your Google account, and within minutes, you'll have access to a transformed email experience. Say goodbye to email overwhelm, stay on top of your tasks, and never miss an important email again with Ultra.
Save time and streamline your email management with Ultra. Try it now and discover a world where AI empowers you to crush your inbox and do more in less time.
Related Reading
• Gmail Spam Filter Not Working
• Free Email Spam Filter For Android
• Email Spam Filter Service
In today's digital age, managing our overflowing email inboxes can feel like an uphill battle. The constant influx of messages, notifications, and newsletters can quickly become overwhelming, leaving us buried under a mountain of unread emails. There is a solution that will not only declutter your inbox but also help you regain control over your digital life: Gmail filter email to folder.
Imagine a world where your emails are neatly organized, effortlessly sorted into specific folders, and easily accessible whenever you need them. With Gmail's powerful filtering system, this utopia becomes a reality. By setting up filters based on keywords, senders, or even specific phrases, you can ensure that each email lands in its designated folder, ready for you to peruse at your leisure. Whether you're a busy professional trying to streamline your workflow or a casual email user looking to take back control, Gmail filter email to folder is the answer you've been searching for.
Not only does Gmail's filtering system help you categorize and organize your incoming emails, but it also provides you with the tools to clear out your mailbox quickly and efficiently. Say goodbye to the days of endlessly scrolling through a cluttered inbox, desperately searching for that one important email. With a few simple clicks, you can can learn "how do I empty my mailbox" and free up valuable digital real estate.
Table of Contents
Complete Step-by-Step Guide On How To Use Ultra's AI Email Filtering Feature
Take Control of Your Email Inbox With Ultra — Get To Inbox Zero Daily
What Is A Gmail Filter?
A Gmail filter is a powerful tool that allows users to automate the organization and management of their email inbox. With Gmail filters, users can create rules that automatically perform specific actions on incoming emails based on a set of criteria. These criteria can include sender, recipient, subject line, keywords, attachments, and more.
Efficient Inbox Management
By setting up filters, users can ensure that their emails are sorted and directed to specific folders or labels, making it easier to find and prioritize important messages. For example, users can create filters to automatically label emails from specific senders, move emails with certain keywords to a designated folder, or mark emails as important based on certain criteria.
Reducing Inbox Overwhelm
Gmail filters not only help in organizing the inbox but also in reducing clutter and improving productivity. By automatically filtering and categorizing incoming emails, users can focus on the most relevant messages and avoid being overwhelmed by an overflowing inbox.
Ultra's Free AI Email Assistant
Everyone is tired of missing important action items and info in long email threads, and getting their emails flooded with spam outreach emails. Imagine a world without inboxes. Email has never been better. Leverage AI to crush your inbox, find what you need, and do more faster. What if an AI took care of your inbox? With Ultra you can get through your emails in minutes with AI.
With Ultra, you can Auto generate AI todo's based on your emails and calendar, You can chat with your inbox like it's ChatGPT (email assistant), and you get AI-shortened summaries so you can skim through it at a glance. Try Ultra’s free AI email assistant today — just login with Google and you’ll be set to go within minutes. Save time and never miss emails again with Ultra.
Related Reading
• Email Filters Gmail
• Spam Filter Iphone Email
• Gmail Date Filter
• Gmail Filter Syntax
• How To Remove Filter In Gmail
• Gmail Apply Filter Retroactively
How To Use The Gmail Filter Email to Folder
Gmail offers a powerful feature called filters that allows you to automatically organize your incoming emails into specific folders. This feature can save you time and help you keep your inbox well-organized. We will walk you through the process of using Gmail's filter email to folder feature.
1. Accessing Gmail Settings
To get started, open your Gmail account and click on the gear icon located at the top right corner of the screen. From the dropdown menu, select "Settings."
2. Creating a New Filter
In the Settings menu, click on the "Filters and Blocked Addresses" tab. Scroll down to find the "Create a new filter" link and click on it.
3. Setting the Filter Criteria
In the "Create filter" dialog box, you can specify the criteria that Gmail will use to filter your emails. There are several options available:
From: Enter the email address or name of the sender you want to filter.
To: Enter your email address to filter emails that were sent specifically to you.
Subject: Filter emails based on the subject line.
Has the words: Filter emails that contain specific keywords.
Doesn't have: Exclude emails that contain certain keywords.
Size: Filter emails based on their size (in kilobytes).
Has attachment: Filter emails that have attachments.
Choose the criteria that best suits your needs and fill in the appropriate fields.
4. Applying the Filter
After specifying the filter criteria, click on the "Create filter" button located at the bottom right corner of the dialog box.
5. Selecting the Action
In the next dialog box, you can choose what action Gmail should take when it detects an email that matches the filter criteria. One of the options available is "Skip the Inbox (Archive it)." Selecting this option will send filtered emails directly to the designated folder, bypassing the inbox.
6. Creating a New Folder
If you haven't created a folder to store your filtered emails yet, you can do so by clicking on the "Choose label" dropdown menu. From there, select "New label" and enter the desired name for your folder.
7. Applying the Filter
To apply the filter, click on the "Create filter" button. Gmail will now filter any incoming emails that match the criteria and send them to the designated folder.
8. Managing Existing Filters
If you want to edit or delete an existing filter, return to the "Filters and Blocked Addresses" tab in the Settings menu. You will see a list of all your filters. To edit a filter, click on the "Edit" link next to the filter you want to modify. To delete a filter, click on the "Delete" link.
Using Gmail's filter email to folder feature can help you stay organized and save time by automatically sorting your incoming emails. By following the step-by-step guide outlined above, you can easily set up filters to direct specific emails to designated folders within your Gmail account.
Complete Step-by-Step Guide On How To Use Ultra's AI Email Filtering Feature
Watch this guide to learn how to use Ultra to empty your mailbox in minutes, today!
Chat with your email inbox like ChatGPT, get a daily to-do list based on your inbox, and much more.
Try Ultra for free today and discover a whole new way to manage your emails with AI. Save time, never miss important emails again, and unleash the full potential of your inbox with Ultra.
Related Reading
• Best Email Spam Filter
• How To Filter Unread Emails In Gmail
• Gmail Filter Move To Folder
• Gmail Filter Wildcard
• Gmail Filter Multiple Email Addresses
• Gmail Filter For Multiple Email Addresses
• Gmail Disable Spam Filter
• Gmail Filter Has The Words
• Gmail Filter Subject Contains Words
• Gmail Filter Older Than
• Gmail Filter Regex
• Gmail Filter Delete After X Days
• Gmail Filter Multiple Senders
• Gmail Filter Calendar Invites
• Reset Gmail Spam Filter
• Gmail Create Filter To Forward Email
• Gmail Filter Apply Multiple Labels
• How To Filter Large Emails In Gmail
• Gmail Filter Not From Domain
Take Control of Your Email Inbox With Ultra — Get To Inbox Zero Daily
Managing our email inboxes can often feel like an overwhelming task. We find ourselves sifting through long email threads, struggling to locate important action items and vital information buried within the clutter. On top of that, our inboxes are flooded with spam outreach emails that distract us from what truly matters. But what if there was a way to revolutionize email management and make our inboxes more efficient than ever before?
Ultra, the AI-powered email assistant that will change the way you interact with your inbox forever. With Ultra, you can say goodbye to endless scrolling and hello to a streamlined email experience. Utilizing the power of AI, Ultra helps you prioritize and organize your emails, allowing you to find what you need and take action faster.
Auto-Generated AI To-dos for Enhanced Productivity
One of the standout features of Ultra is its ability to automatically generate AI todo's based on your emails and calendar. By analyzing the content of your emails and understanding your scheduling preferences, Ultra can identify important tasks and deadlines, and create todos for you. With this feature, you can easily stay on top of your commitments and never miss a deadline again.
Chat with Your Inbox Like It's ChatGPT
Imagine being able to communicate with your inbox as effortlessly as chatting with a virtual assistant. Ultra brings this vision to life by allowing you to chat with your inbox using natural language. Just like ChatGPT, Ultra understands your commands and responds accordingly. Whether you want to search for specific emails, archive messages, or schedule meetings, you can simply chat with Ultra and let it handle the rest.
AI-Shortened Summaries for Efficient Email Skimming
In a world where time is of the essence, skimming through lengthy emails can be a daunting task. Ultra solves this problem by providing AI-shortened summaries for each email. These summaries give you a quick overview of the email content, allowing you to grasp the key points at a glance. With this feature, you can save time by prioritizing the emails that require immediate attention and swiftly moving through the rest.
Try Ultra's Free AI Email Assistant Today!
Are you ready to take control of your inbox and experience the benefits of AI-powered email management? Try Ultra's free AI email assistant today. All you need to do is log in with your Google account, and within minutes, you'll have access to a transformed email experience. Say goodbye to email overwhelm, stay on top of your tasks, and never miss an important email again with Ultra.
Save time and streamline your email management with Ultra. Try it now and discover a world where AI empowers you to crush your inbox and do more in less time.
Related Reading
• Gmail Spam Filter Not Working
• Free Email Spam Filter For Android
• Email Spam Filter Service
Imagine a world without inboxes.